Abstract
This section introduces the main audio applications you may need for your entertainment: Amarok the music player, KsCD the CD player, and KMix the sound mixer. They can all be accessed by choosing → from the main menu.
Amarok is “the” multimedia application to listen to your favorite music. You can organize your music into collections, get information about recordings such as artist, lyrics, album covers, and more. We only describe its essential features. You can safely the wizard that appears the 1st time you run Amarok.
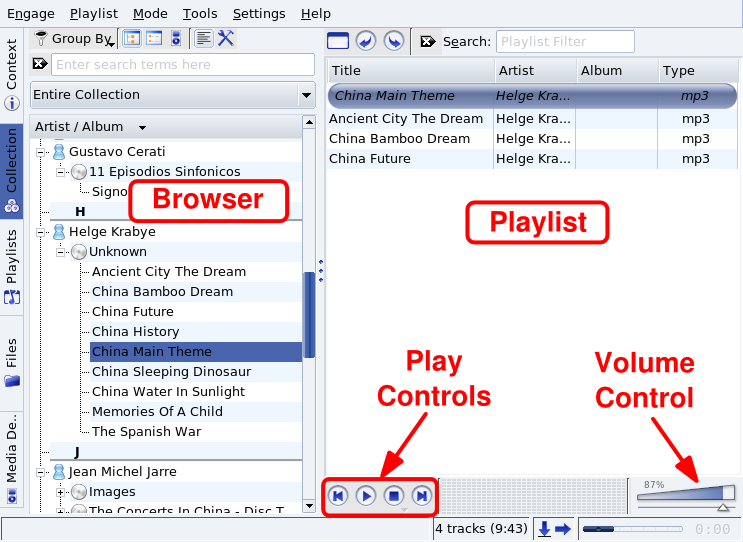
Figure 4.1, “amaroK's Main Window” shows the main interface components of Amarok:
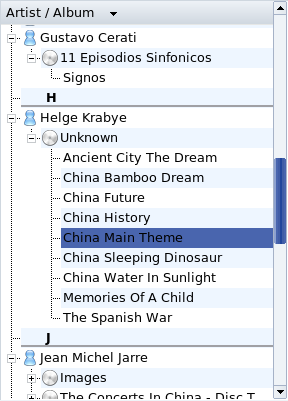
Browser. This displays various information depending on the function selected using the tabs at its left.
Playlist. Where the files to be played are shown. Right click on any file to access a menu allowing you to play the file, remove it from the playlist, etc.
Play Controls. Amarok's play controls are “standard” audio equipment ones: Previous/Next Tracks, Play, Stop. The Play button doubles as a Pause button too. Keep the Stop button pressed to select whether to stop playing immediately, after the current playing song has finished, or after the whole playlist has been played.
Volume Control. Slide it right to increase the volume and left to decrease it. Right click on it and select Equalizer from the menu that pops up to open an equalizer window where you can enhance bass and treble, and even select some preset equalization curves.
![[Note]](images/note.png) |
Note |
|---|---|
|
 Once
Once You access Amarok's main features by clicking on the tabs located at the left of the Browser.
 The
context browser which spreads out on three
tabs: Music, Lyrics, and
Artist, gives you various information on the
music currently playing.
The
context browser which spreads out on three
tabs: Music, Lyrics, and
Artist, gives you various information on the
music currently playing.
 The
Collection browser enables you to view and
organize your entire music collection. To use it, you need to create
a collection first: click on the
The
Collection browser enables you to view and
organize your entire music collection. To use it, you need to create
a collection first: click on the  button, check all
the folders you want Amarok to look in for music files, and
click to start building the
collection.
button, check all
the folders you want Amarok to look in for music files, and
click to start building the
collection.
![[Warning]](images/warning.png)
![[Tip]](images/tip.png) |
Tip |
|---|---|
If you add music files to the folders part of a collection, choose → from the menu to update the collection. |
 The playlist browser lets you roam your playlists
and podcasts. If you don't have any, you can listen to the
Cool-Streams, which is a collection of online
radio broadcasts. To create a playlist, simply drag tunes into
the playlist, then select
and give it a name. To add new podcasts, click
the button, select
and add the podcast's URL
into the dialog.
The playlist browser lets you roam your playlists
and podcasts. If you don't have any, you can listen to the
Cool-Streams, which is a collection of online
radio broadcasts. To create a playlist, simply drag tunes into
the playlist, then select
and give it a name. To add new podcasts, click
the button, select
and add the podcast's URL
into the dialog.
 The File Browser allows you to access
and search your local file system. You can use it as an alternative
to Amarok's Collection.
The File Browser allows you to access
and search your local file system. You can use it as an alternative
to Amarok's Collection.
 The
Media Device Browser allows you to transfer songs to your portable
audio device, such as an iPod.
The
Media Device Browser allows you to transfer songs to your portable
audio device, such as an iPod.
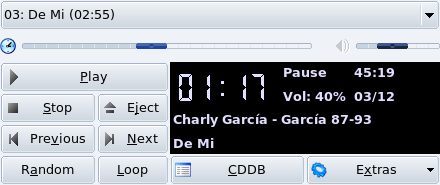
When you insert an audio CD in your CD drive, a window pops up; if you choose to play the CD, the KsCD player starts up.
|
Tip |
|---|---|
|
 Once
Once On the left, you have the typical CD player controls: , , , etc. The ones below alter the playing order. The button can be used if your CD information doesn't appear automatically, it will display the CD's title, artist and tracklist information. The button lets you access more advanced configuration options.
KMix is a sound mixing application for KDE. It allows you to fine-tune your sound card's audio levels through various sliders.
|
Note |
|---|---|
The availability and type of the controls discussed below depend on your particular sound card. Some controls may even be absent for your hardware. |
![]() When KMix starts, this quick-launch icon
appears near the clock. Click on it, then click
to view the full mixer window.
When KMix starts, this quick-launch icon
appears near the clock. Click on it, then click
to view the full mixer window.
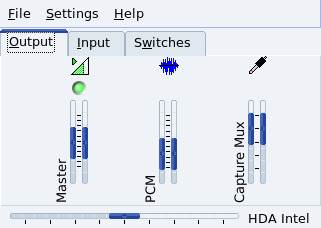
The Output tab controls the volume levels of the sound sources of your sound card. The most important one is the Master which controls the general volume. By right clicking on each slider, you have extra options such as Split Channels, Muted Hide, etc. Clicking on the green dot at the top of a column mutes or unmutes that sound source.
|
Tip |
|---|---|
Clicking on the quick-launch icon pops up a slider which lets you control the master volume and mute all sound. |
The Input tab controls the volume levels of the recording sources of your sound card. If you use videoconferencing software or are a musician, this is where you'll want to adjust your microphone and your auxiliary devices. Clicking on the green dot at the top of a column mutes or unmutes that recording source, the red dot at the bottom enables or disables it.
The Switches tab goes deeper into your sound card's configuration. Boosting your microphone, using an external amplifier: these features are for advanced users who want to really master their sound system. To activate them, simply click on the dot at the top of each column.
Finally, the horizontal slider enables you to balance your sound between the left and right speakers. Notice that if your sound card supports separate levels for master's right and left, the Output's Master controllers are be modified following the movement of the horizontal balance slider.