![]() This tool allows you to backup the data present on your
computer to different media and also to a remote machine over a
network. It also supports multiple profiles for different backup
scenarios. Once the parameters are set, you can run the backup
periodically. Then, you can forget about it until you wish or need to
restore files.
This tool allows you to backup the data present on your
computer to different media and also to a remote machine over a
network. It also supports multiple profiles for different backup
scenarios. Once the parameters are set, you can run the backup
periodically. Then, you can forget about it until you wish or need to
restore files.
You can access this tool by clicking on the Backups icon in Mandriva Linux Control Center's System section. Click on the button to start the wizard. After making your choices in each step click on .
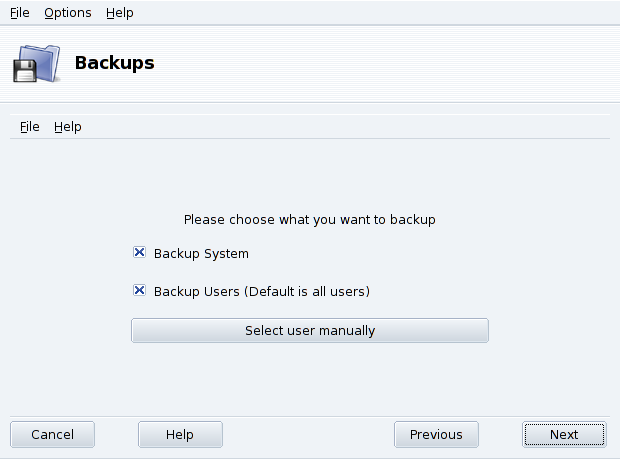
Select Backup
System to include the /etc
directory where all your current system configuration files
lie. This allows you to “transport” your system to
another computer with little effort: only hardware-dependent
configuration will have to be revised.
![[Note]](images/note.png)
Select
Backup Users to include all the files
included in all of your users' /home
directories. Clicking on the button lets you select individual users
and gives you the following options:
Do not include the browser cache. Selecting this option is recommended due to the very nature of the ever-changing browser cache.
Use Incremental/Differential Backups. Selecting this will preserve old backups. Choosing Use Incremental Backups will only save files which have been changed or added since the last backup operation. Choosing Use Differential Backups will only save files which have been changed or added since the first backup operation (also known as the “base” backup). This last option takes more space than the first one, but allows you to restore the system “as it was” at any given point in time for which a differential backup was made.
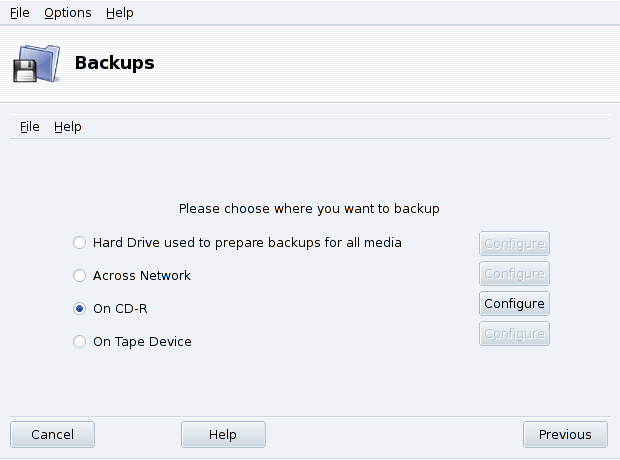
All possible backup media are listed, along with a Configure button to change media-dependent options:
- Hard Disk Drive
The local hard disk drive is used to prepare backups for all media except NFS and direct to tape. You should not perform backups on your local hard disk anyway, you should always backup to remote or removable media. You can set the directory for storage and the limit of storage space. You can also set how many days to keep incremental or differential backups in order to save disk space.
- Across the Network
To store the backup on a remote computer accessible using different methods. You can set the connection parameters as well as the access method and its options (if applicable). Please note that NFS backups are considered to be local disk backups, even if they are effectively stored on a remote system.
- On Tape
You can set the tape device if it's not detected automatically, and tape parameters such as writing directly on tape, whether or not to rewind, erase and eject the tape.
- Optical Media (CD-R)
This is our preferred media for the example, so click on its button to set the required parameters (see Figure 10.10, “Setting Optical Media Parameters”).
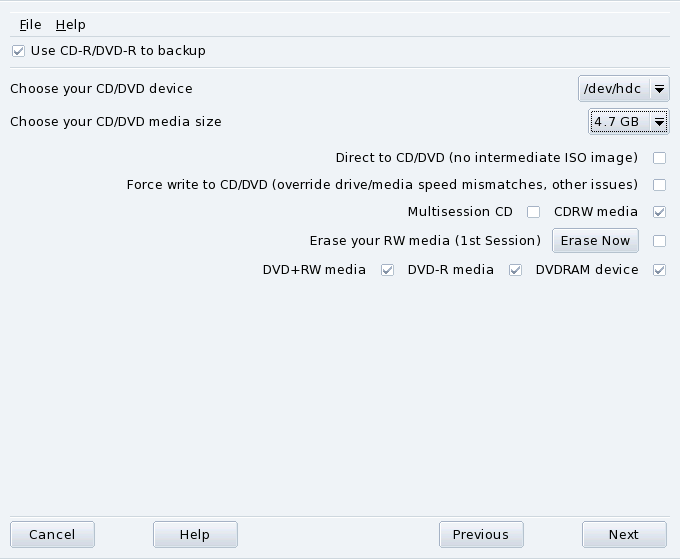
If it isn't done automatically, use the Choose your CD/DVD device combo box to set the CD/DVD device. Set the medium's type and size, multisession and erase options.
For multisession recordings, please bear in mind that the option to erase the medium is only effective for the 1st session and also that session-related information recording takes some space out (20 to 30 MB) for each session, so the “real data” storage space will actually be less than the medium's size.
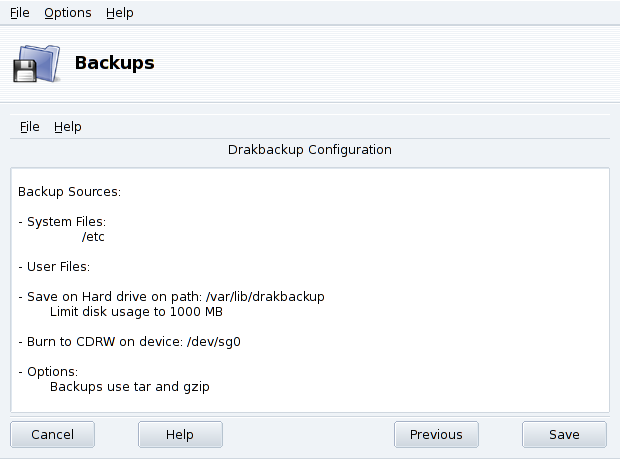
The last wizard step
shows a summary of the configuration parameters. Use the
button to change any parameter
you are not satisfied with. Click on
to store them on the Default profile. The
backup set is now ready to be performed.
Backup Profiles
You can choose → from the menu and provide a profile name to store the current backup settings within a named backup profile. You can then run the configuration wizard again, define other settings and store them under a different profile.
Use the --profile Profile_Name.conf option
when you run Drakbackup from the command line to load the
Profile_Name.conf profile.
Click on , make sure the corresponding media is ready (the recordable CDs in our example), and then on to perform the backup.
A dialog will display the current progress of the operation. Please be patient: the time it takes to back up depends on many factors such as the size of the backup file set, the speed of the storage option selected, and so on. Once the operation is finished a report is shown: look for possible errors on it and take corrective measures if needed.
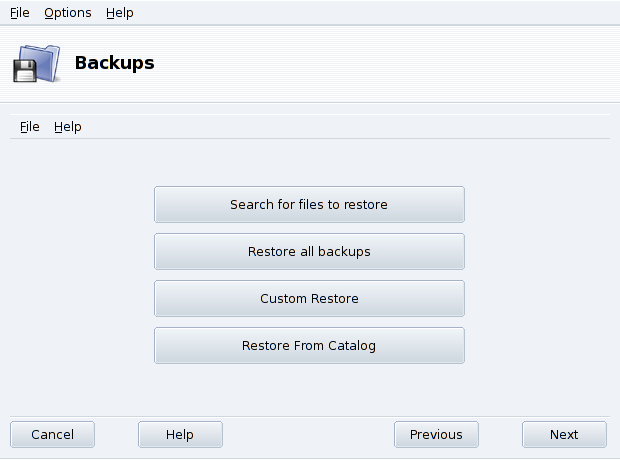
Make sure the media you want to restore the backup from is accessible and ready and click on the button. In our example we restore the whole backup so on the restore dialog (Figure 10.12, “Choosing the Restore Type to Perform”) click on and then on the button to start the restoration process.
![[Warning]](images/warning.png) |
Warning |
|---|---|
Existing files in the target restoration directory (the same location as the backup was made from, by default) will be overwritten. |
Feel free to investigate the other restore options if you want to restore part of a backup instead of the full file set, or to restore the backup to a different location.
In the tool's main window, click on and then on the button. In the backup scheduling window (see Figure 10.13, “Daemon Options Window”) select Use daemon to define the schedule.
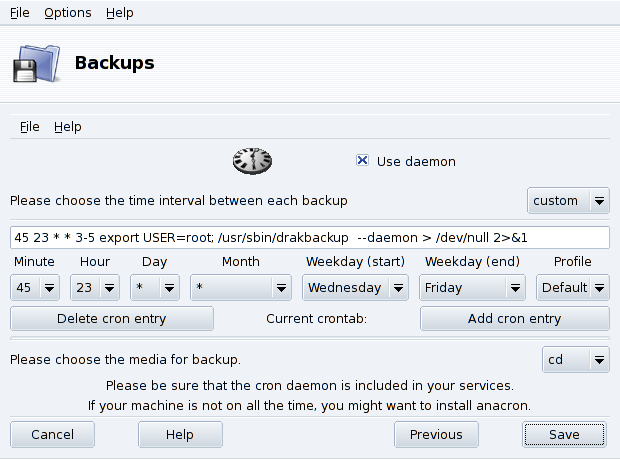
You are then asked to specify the interval (or period) between each backup operation and the storage media. In our example we set up a customized calendar (custom period selected) to perform a backup from Wednesday to Friday at a quarter to midnight and store it on CD, using the Default backup profile.
Click on and then on the button to set more backup options (see Figure 10.14, “Miscellaneous Options Window”).
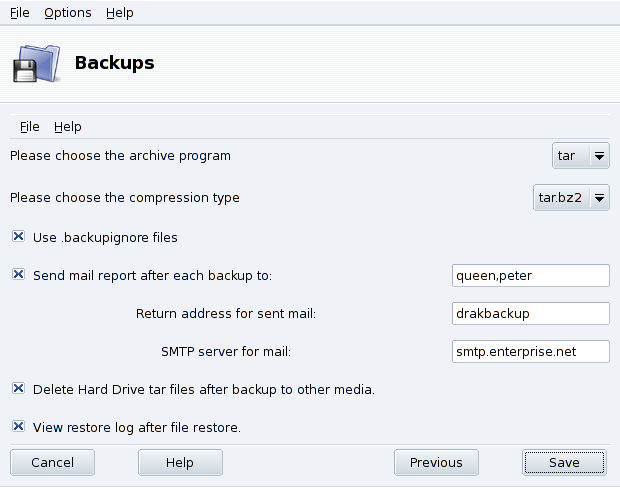
- Archiving Program
You can choose between tar (the default) and star which allows you to backup extended ACLs too.
- Compression Type
You can choose the compression strategy used for your backups among
tar(no compression),tar.gz(gzip compression) andtar.bz2(bzip2 compression: better but slower).- Files to Ignore
-
You can exclude certain files from the backup. The
.backupignorefile should be present in every directory of the backup file set where files are to be excluded. Its syntax is very simple: a one-file-per-line list of the names of the files to exclude. - Send Reports by Email
Fill the mail address to which a report of the operation will be sent. You can specify many mail addresses by separating each with a comma (
,). Please also complete the Return address for sent mail field with the email address of the backups administrator, and the SMTP server for mail field with the name or IP address of the outgoing mail server.- Delete Temporary Files
Select the Delete Hard Drive tar files after backup to other media option to free that space after performing the backup.
- View Restore Log
You can choose to view the restore operation log after each restore. This can be handy to spot and fix potential problems when restoring files: reading errors, network communications errors, etc.
![[Tip]](images/tip.png)